Announcing a New Faculty Learning Community in Digital Humanities

The Digital Innovation Lab and the Center for Faculty Excellence are proud to announce a new opportunity for UNC faculty: The Faculty Learning Community in Digital Humanities (DH FLC).

The DH FLC is intended for faculty who are interested in incorporating digital technologies and approaches into their humanities teaching and research. Over the course of about 12 months, the DH FLC will learn together and from one another about digital humanities approaches and methodologies, study exemplar projects, and be exposed to a range of open-source tools for creating digital humanities projects. Participants will apply what they learn toward developing a digital humanities project to be used for hands-on, undergraduate learning.

The DH FLC will be comprised of an interdisciplinary and diverse group of participants representing a broad range and extent of DH knowledge and experience. Faculty with little/no technical knowledge are equally encouraged to apply as those with DH experience. There are no technical or experiential prerequisites for joining the DH FLC beyond an interest and curiosity in DH teaching and research. Faculty at all ranks (tenure, tenure-track, fixed-term, adjunct, research or clinical rank, lecturers, or instructors) are invited to apply.

The DH FLC is part of the Curricular Innovation and Professional Development program of the Carolina Digital Humanities Initiative (CDHI), an effort supported by the Andrew W. Mellon Foundation to develop a sustainable and scalable model of digital humanities at UNC.

Learn more about the DH FLC and how to apply. Applications are due Monday, January 6, 2014. Questions should be directed to DIL Manager Pam Lach.

Graduate Student Digital History Project Featured

Lorraine Ahearn, a Journalism PhD student who took the DIL’s AMST 890: Digital Humanities/Digital History: Recovering and Representing the Past (Fall 2011), is featured in the most recent issue of Endeavors Magazine for her work on Windows to the Past, a digital history project about downtown Greensboro.

The project was built with a group of public history graduate students at The University of North Carolina-Greensboro. Lorraine and a classmate worked on building a web-based walking tour of Greensboro history using our Main Street, Carolina platform. You can see the project here.

Lorraine was recently awarded a Graduate Education Advancement Board Impact Award for her work on the project.

Read more about Lorraine.


A Guide to Developing Digital Oral History Projects using DH Press, Part 2

This is the second part of a two-part blog post documenting how to use DH Press to create digital oral history projects. Return to Part 1.


Workflow at a Glance

After you have completed your interviews, you can follow this general workflow for creating an oral history project in DH Press:

  1. Produce a clean, edited transcript
  2. Timestamp the transcript, either manually or using a timestamping tool
  3. Format the transcript for the DH Press Audio/Transcript Tool
  4. Load your audio files to SoundCloud, and/or your video files to YouTube
  5. Load all of your timestamped, formatted transcripts to the DH Press Media Library
  6. Create your data set
  7. Import your data into DH Press
  8. Configure your DH Press project and add any additional content to your website

Step 1. Create all Transcripts

In order to use the DH Press Audio/Transcript Tool to its fullest, you will need complete transcripts for each interview. Follow whatever process your organization uses to create and edit your transcripts.

If you do not have the capacity to create complete transcripts, you may consider transcribing the relevant sections of your interview, or possibly working with tape logs. However, this will limit the usability of those interviews in DH Press, as it will constrain your users’ ability to explore fully each interview.

Format

Transcripts should be saved as either Word files (.doc or .docx) or Plain Test (.txt) files. See Step 3 below for more details.

Step 2. Timestamp all Transcripts

Once you have a completed transcript, you will need to timestamp it. In other words, you will need to provide the corresponding times that match various moments in your transcript to the actual media file. For example:

Example of a timestamped transcript

Example of a timestamped transcript

Each transcript that you plan to include in your DH Press project will need to be timestamped.

There are two ways you can develop timestamps, either by using a timestamping tool, or by producing your timestamps manually.

Automated Timestamping

There are some tools available that will produce a timestamped transcript for you. Essentially they allow you to feed your transcript and audio file into the tool, and the tool returns a timestamped transcript. We have used Docsoft:AV for this purpose. However, this is proprietary, and quite expensive, software. Docsoft:AV produces timestamps at short intervals, typically every few seconds. It is accurate down to the microsecond level. You may need to re-process your transcript several times in order to obtain accurate timestamps.

The Louie B. Nunn Center for Oral History at the University of Kentucky Libraries created OHMS: Oral History Metadata Synchonizer which may also be of use for timestamping.

Manual Timestamping

If you don’t have access to an automated timestamping tool, you can insert timestamps manually, either during the initial transcribing process, or after. In other words, you can manually type in your timestamps at whatever interval you choose. For instance, you may want to insert a timestamp at every question and response, or at even intervals, such as every two or five minutes. Timestamps can be inserted in the middle of sentences. The more timestamps you insert, the more control users will have to navigate, explore, and jump around in an interview.

When deciding how to timestamp your transcripts, you may need to balance the needs of your users against your own resources (time, labor, deadlines).

There are many free tools out there that can assist with your timestamping process. ExpressScribe is one such tool that allows you to slow down the audio to get a more precise timestamp. It supports timestamps to the microsecond level, and can be integrated with a foot pedal.

Timestamp Format

Regardless of which approach you take, each timestamp should be formatted accordingly:

[HH:MM:SS.MS]

That is: [Hour:Minute:Second.Microsecond]

Brackets are required at both the beginning and end of every timestamp. Each value (hour, minute, second, microsecond) should appear as a double digit. Use a zero as the first number when appropriate (03 instead of 3 seconds, for instance). Hours, minutes and seconds should be separated by colons (do not use extra spaces). Microseconds are optional; when used they should be separated with a period. Please note that you will need a concluding timestamp at the end of the transcript, indicating the end of the audio file.

  • Example of a full timestamp: [01:11:03.94]
  • Example of a timestamp without microsecond: [01:09:22]
  • Example of a timestamp for an interview that is less than an hour: [00:39:43.73] or [00:39:43], which corresponds to thirty-nine minutes and forty-three seconds (and 73 microseconds).

Step 3. Format all Transcripts

All timestamped transcripts should be formatted according to the following specifications:

Placement of Timestamps

Each timestamps should be placed on a line by itself, with the corresponding text appearing below the timestamp. For example:

[00:30:09.83]

But I became sort of a good wife, and he wanted to go on to graduate school at  [00:30:17.63]

the University of Virginia.

[00:30:18.63]

JW: Why did you get married?

[00:30:20.13]

HL: It was considered the thing to do. So I’m working in the governor’s office,  [00:30:28.19]

he’s at Emory, and he would visit every weekend and of course my family liked

Speaker Names

The interviewer and interviewee’s names should be listed in full the first time each one speaks. Initials may be used each subsequent time. If you prefer, you may continue to use the full names each time, or just the last name. Adopt whatever approach is common among your organization or collaborators. Any of these formats will work in DH Press, but we recommend consistency within and across each transcript. For example:

[00:00:00.00]

Jessie Wilkerson: Now it’s on. Okay.

[00:00:02.43]

Helen Lewis: Okay, we were talking about when I moved to Forsyth County and

[00:02:36.89]

JW: Oh, goodness.

[00:02:37.89]

HL: That’s when I was in high school. So those were my experiences in Forsyth

Sentence Spacing

DH Press can only display text transcripts with a single space after periods. All double (or triple) spaces after periods should be eliminated. See why you should never use two spaces after a period. Likewise, only use single spacing between sentences/lines.

Here is an example of a complete timestamped transcript.

Additional Interview Metadata

No additional information (such as title, interview date, interview location, interviewer’s name) should appear on the transcript. That is, all header or metadata information should be stripped from the final transcript.

We recommend that you create a corresponding metadata text file or spreadsheet for this information, which might include the following fields:

  • Interviewer(s)
  • Interviewee(s)
  • Interview Date
  • Interview Location
  • Transcriber(s)
  • Notes

You may also need to record the filename of the audio/video file, and where it is being stored locally (e.g. on a hard drive, on a server, in a cloud-based site such as Dropbox, etc.).

File Format

In order for DH Press to display transcripts properly, you will need to convert each transcript to a plain text (Unicode UTF-8) file format.

Before doing that, we recommend that you remove any special formatting, such as:

  • Bold or italics
  • Special paragraph formatting, such as double spacing or hanging lines (note that double spacing between sentences may throw an error in the tool)

You can leave special characters (such as serif quotation marks, ampersands, tildes, accents, umlauts) intact.

When ready, re-save the file using the plain text file format. In Microsoft Word: Save as > Format (Plain Text) > Encoding (UTF-8). Once the save is completed, you will see a duplicate filename with a .txt file extension (in contrast to .doc or .docx). For example:

LachPam_transcript.docx

LachPam_transcript.txt

Alternatively, you can save the text file with a new filename.

You may continue working from the .docx file to create your data (see Step 6) but the .txt file is the one that will be loaded into DH Press (see Step 5).

We recommend that you double check your transcript formatting in a plain text editor (Windows: Notepad (built in) or Notepad++; Mac: TextEdit (built in) or TextWrangler) to ensure that there is no strange formatting in your document. You may need to manually edit the transcript to remove any potential formatting problems.

File Name

When naming your transcript file, we strongly recommend that you adhere to naming conventions for web files. Most importantly:

  • Do not include spaces in your file name
    • Good: PamLachTranscript or Pam_Lach_Transcript or Pam-Lach-Transcript
    • Bad: Pam Lach Transcript
  • Do not include any special characters in your file name, such as:
    • Commas, apostrophes, quotation marks, accents, or ampersands

Step 4. Load all Digital Media Files to SoundCloud or YouTube

DH Press’s Audio/Transcript Tool works by linking your audio file to your transcript file, both of which would have been pre-loaded to the web.

All audio files will need to be loaded to SoundCloud in order for your project to work. Please consult SoundCloud’s documentation to learn how to upload your content. We recommend that you load your files using the mp3 format. Uploading WAV files will result in file compression/truncation, which can adversely impact performance in DH Press.

You will need to copy the URL for each individual audio file that you upload. Each URL will need to be included in the data file you will build for the project. Each audio file must have a unique URL.

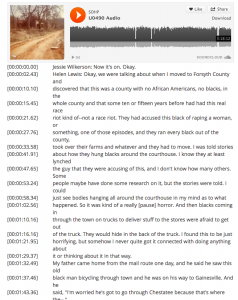
To grab the URL, simply navigate to the file and copy the URL in the navigation bar. For example: https://soundcloud.com/sohp/u0490-audio. There is no need to grab either the Widget Code (the <iframe> code) or the WordPress Code. We recommend that you paste all URLs into a spreadsheet or Word document to keep track of all URLs. For example:

Interviewee Audio_URL
Helen Lewis https://soundcloud.com/sohp/u0490-audio

You can do the same for video files, but you’ll load those files to YouTube.

Step 5. Load all Transcripts into DH Press

Likewise, each timestamped transcript .txt file will need to be loaded to your DH Press Media Library. You can bulk load these files: WordPress Dashboard > Media Library > Add New and select all the files you want to load (you can also load these in one-by-one). As with your media files, you’ll need to copy the URL for each individual transcript. To do that, navigate to the Media Library and select the “View” option for each individual transcript.

You should add your transcript URLS to your tracking document:

Interviewee Audio_URL Transcript_URL
Helen Lewis https://soundcloud.com/sohp/u0490-audio http://dhpress.org/dev/wp-content/uploads/2013/04/Lewis-Helen-timecoded.txt

The exact URL for your transcript will vary.

Step 6. Create all Data for DH Press Project

You are now ready to create the data for your DH Press project. This is the process whereby you transform the stories related in your oral histories into data (rows and columns in a spreadsheet) based on common themes. Project data are created outside of the DH Press environment and imported later. Please consult our Data Documentation for more information about required fields, supported data formats, and data collection tools available.

Essentially, the process of creating your data is an indexing project, similar to assigning tags to various segments of each interview. This allows you to describe various portions of an interview. Each chunk you describe becomes a row of data in your spreadsheet, which in turn, becomes a dot on the map. Each chunk has a starting point and an ending point, both of which correspond to the timestamps in your transcript. Make sure all timestamps in your data exactly match the timestamps in the transcript, or you will get error messages in DH Press.

This chunk of the transcript corresponds to a single row of data in the spreadsheet.

This chunk of the transcript corresponds to a single row of data in the spreadsheet.

Determining a data model for your project can be tricky, especially if you are not accustomed to thinking about your work in data terms. Unfortunately, that is beyond the scope of this documentation. Email me if you would like to set up a brief consultation about your data.

Choosing a Data Collection Tool

Data may be gathered in a variety of ways, using a range of tools, but data sets can only be bulk imported into DH Press when formatted as comma-separated values (CSV) files. Using a spreadsheet that can output as CSV is probably the easiest way to create your data.

There are numerous spreadsheet tools available, including Microsoft Excel, Google Spreadsheets, Apple Numbers, or any other open source spreadsheet tool. Whatever spreadsheet tool you select, make sure it can export files as CSV.

*Mac users working in Excel must use the Windows Comma Separated (CSV) file format, or data will not successfully import into DH Press.

Fields Required for DH Press

Whatever data you want to represent in your digital oral history project, there are a few fields (spreadsheet columns) that are absolutely necessary. The following three columns should appear at the beginning of your data (Columns A, B and C, respectively), with an optional fourth column (Column D):

  1. csv_post_title
  2. csv_post_type
  3. project_id
  4. csv_post_post (optional)

Make sure all fields names are lowercased and that there are no hanging spaces at the end of the field name. Use only underscores in these field names. Please consult our data documentation for an explanation of each field, and their appropriate values.

You can also download a DH Press data template to assist you in your data collection. Note that the fourth column in the spreadsheet (csv_post_post) is optional.

Required Fields for Audio/Transcript Tool

In addition, you will need to create columns to capture all of the information about your interviews (interview metadata). This should include:

  1. Interviewee_name
  2. Interviewer_name
  3. Interview_location
  4. Interview_date
  5. Media_URL (SoundCloud or YouTube URL)*
  6. Transcript_URL (DH Press URL)
  7. Timestamp

The Timestamp column is critical for enabling users to jump around and explore an audio file and transcript. This column captures the starting point and ending point of the segment of the interview you are describing. This corresponds to the actual beginning and closing timestamp in the transcript. It should be formatted accordingly: starting point-ending point. For example: 00:00:02.43-00:03:05:66

*The current version of DH Press cannot support using SoundCloud and YouTube files interchangeably. If you are working with a mix of audio and video files, we recommend that you create two separate fields in your data: Audio_URL and Video_URL. Please note that we have not yet incorporated YouTube media files into the Audio/Transcript Tool but hope to do so soon.

Other Possible/Suggested Fields

Once you have established these eleven required fields, the rest is completely up to you and what you are trying to visualize in your project. You might think about recording common, overarching themes, or keywords, or other descriptive information. There is also space for extended narrative, interpretation, or analysis (we recommend using the csv_post_post field for this).

Note: in order to use the mapping tool (currently our only available visualization, or entry point), you will need a field for Latitude and Longitude. This can be represented as a single field (latitude,longitude) or as two distinct columns. Whichever way you prefer, make sure that Latitude is always listed first. DH Press uses the Decimal Degrees format (not the Degrees, Minutes, Seconds format), which can be obtained via Google Earth or Google Maps (or a similar program). To see latitude/longitude in Google Maps, enter the location address in the search bar, and then right click the map marker. Select What’s Here to display the latitude and longitude coordinates.

Whatever you decide, these columns can potentially be used to create distinct filters (“legends”) for your map, where unique values determine each marker’s appearance. For example, in the “Mapping the Long Women’s Movement,” markers all dealing with the women’s movement are purple, while markers related to education are blue.

Here is a segment of the data we collected for the Long Women’s Movement project:

An incomplete segment of Long Women's Movement data.

An incomplete segment of Long Women’s Movement data.

Step 7. Import all Data into DH Press Project

Once you’ve completed and cleaned your data (checked for consistency), you should be ready to import your data into DH Press. Remember to add the appropriate project_id value to your spreadsheet prior to importation. Please consult our documentation to learn more about these processes.

There are some common mistakes that occur when importing data, including:

  • ERROR: row(s) of data (e.g. “marker posts”) do not import (error message: Skipped N posts)
    • CAUSE: missing unique “csv_post_title” value (Column A)
  • ERROR: posts imported but not as Marker Posts
    • CAUSE: missing “dhp-markers” value (Column B)
  • ERROR: posts imported as Marker Posts but are “orphaned”
    • CAUSE: missing or incorrect “project_id” value (Column C)
    • markers will show up in Marker Library but will not show up when you try to configure your project (if none of your data fields show up, it means the Project ID was wrong)

Step 8. Configure DH Press Project

Example of configuring the A/V Entry Point, with optional second language transcript.

Example of configuring the A/V Entry Point, with optional second language transcript.

When you’re ready to create your DH Press project, please consult our DH Press documentation. You may also want to review our at-a-glance project creation workflow.

In particular, you’ll need to format the following “motes” accordingly:

Audio URL: configure as FILE data type
Transcript URL = configure as FILE data type
Timestamp = configure as TEXT data type

In addition to creating a Map Entry Point, you’ll need a second entry point “A/V Transcript.” This entry point should be added as the entry point in the modal. This should be the only entry point assigned in the modal.

Once the project is configured, you should be ready to share it with your audience. Because DH Press is integrated into WordPress, you can also create any number of other pages related to your project, your staff, your sponsoring organization, or other similar projects.


Using non-English Languages

As noted earlier in this documentation, preliminary testing suggests that non-English interviews can be used in DH Press, provided the transcripts are formatted as Plain Text, encoded as Unicode (UTF-8). To date, we have only tested Spanish. To see this in action, visit Digital Portobelo: Art + Scholarship + Cultural Preservation.

Moving Beyond Oral History

We are beginning to think about how the DH Press Audio/Transcript Tool might be adapted more broadly beyond digital oral history projects. In theory, any sort of streaming multimedia could be used, provided there is a supporting .txt file with some sort of timestamps to assist with navigation, i.e. an index with the appropriate metadata. One potential adopter suggested using the tool as a bridge between recorded music and sheet music, assuming the sheet music could be converted to a plain text file. You could also use the tool for documentaries and other films.

We are only just beginning to explore the possibilities, so stay tuned for future experimentation.

Need Help?

Have an idea for an extension to the Audio/Transcript Tool? Or need help getting your project started? Contact me!

Return to Part 1.

A Guide to Developing Digital Oral History Projects using DH Press, Part 1

Since the launch of “Mapping the Long Women’s Movement,” people have been asking me how they can develop their own audio-based digital projects using the beta version of DH Press. Given all of the interest, I thought it would be helpful to dedicate an entire post to the process we developed to create the Long Women’s Movement project.

This post (which is broken into two parts – skip to Part 2) provides basic documentation for planning and executing a digital oral history project. Intended as a basic primer, the discussion/instructions will be fairly general. I will conclude this post by discussing some of the ways DH Press might be adapted for audio or visual media projects well beyond the oral history context.

To learn more about whether DH Press is right for your project, you can email me to set up a brief (virtual) consultation.

At a Glance

DH Press is a flexible, repurposable, extensible digital humanities toolkit designed for non-technical users. Designed as a WordPress plugin, it enables administrative users to mashup and visualize a variety of digitized humanities-related material, including historical maps, images, manuscripts, and multimedia content. DH Press can be used to create a range of digital projects, from virtual walking tours and interactive exhibits, to classroom teaching tools and community repositories. Learn more.

We used “Mapping the Long Women’s Movement” as the primary project for developing DH Press. As a result, the toolkit is quite robust in its handling of oral history content.

Specifically, DH Press offers an innovative approach to delivering digitized oral history content through its Audio/Transcript Tool. Traditional library catalogs may host an oral history’s full audio file, accompanied by a transcript (often as a PDF). But that system is often inadequate for finding what you’re looking for, since it relies upon limited indexing and in-browser searching (which only works for exact text matches). And while the audio files are accessible, they are typically underutilized because it is far easier to skim a transcript than listen to a long interview.

Our toolkit allows users to explore audio files and their accompanying transcripts by jumping directly into the audio file, using the transcript and the map-based visualization as anchors for searching and browsing the content. Each marker on the map is associated with a segment of an audio file. When you click on a marker, you’ll be able to listen to that section of the interview, read the corresponding transcript, and see additional information about that audio segment. You can then link out to the full audio/transcript, where you can listen to the entire file or jump around / explore as you like. Read more.

Here’s a brief demo of our “Mapping the Long Women’s Movement” digital oral history project:

What You’ll Need

In order to create your own digital oral history project using DH Press, you’ll need the following:

  1. Digital media files of interviews
    1. Audio Files: mp3 or mp4
    2. Video Files: see this list of supported file formats
    3. Clean/edited transcripts with timestamps
    4. A WordPress website with the DH Press plugin installed and the map library installed
      1. Note: wordpress.com sites cannot support DH Press
      2. Learn how to use DH Press
    5. Third-party streaming account with one or both of the following providers, depending on whether you’re using audio or video files
      1. Audio Files: SoundCloud account (possibly a pro account depending on the amount of content you have)
      2. Video Files: YouTube account

Supported File Formats

Language

Currently, DH Press supports English-language transcripts. We are in the process of testing the tool with Spanish oral histories; preliminary results indicate that we can support Spanish.

In theory, we believe the tool will support any language that can be formatted in encoded as Unicode UTF-8 characters.

Media Files

Likewise, currently DH Press supports audio files streamed from SoundCloud. We are currently expanding the Audio/Transcript Tool to support videos streamed from YouTube. However, we have not yet tested this functionality and cannot guarantee immediate support for this format.

Part 2 of this post will cover the recommended workflow for creating your own Oral History project in DH Press.

DH Press Update: Fall 2013

I’ve delayed updating my project blog for quite some time while the DH Press team has worked to prioritize the enhancements and added features for the beta 2.0 version. These features have been determined in large part by the needs and requirements of many of our ongoing projects. We have several DH Press projects that will be launching in the next several months; these projects must necessarily determine much of our work for the time being. Specifically, the Digital Portobelo project (a DIL/IAH Faculty Fellow Project; learn more at the project blog) and the Lebanese Migration to NC Project have firm launch dates. Both projects require enhancements to the tool that, we hope, will make for a more robust platform for other users. I’ll blog about these two projects shortly.

For now, I want to share what we’ve been working on lately, and the directions we expect to be taking in the next three months or so.


Recent Developments

For starters, Joe Hope (RENCI) has been working diligently to clean up the beta plugin. He’s been streamlining the code to make future programming easier. He’s also removing all legacy references to “diPH” (the original and ill-fitted name of the toolkit). In the process, he has significantly revised some of the existing functionality, and our DH Press development team is now testing the revised plugin (version 1.5?) to help debug it. Joe will be updating the plugin on GitHub soon.

Joe has also created a new multisite WordPress environment for live projects, so that we can get them out of our Sandbox. This will help us clean the Sandbox, and reserve it as a space entirely for testing and playing. Right now, we have 39 sites and a total of 87 users in the Sandbox. Many of the sites are inactive, and I am currently assessing which of our inactive sites can be deleted to free up server space for our more active users (if you have a Sandbox account, look for an email from me in the coming weeks).

We are also updating the default WordPress theme for DH Press from Twenty Twelve to Twenty Thirteen. This will improve the usability of DH Press projects by moving the navigation bar below the header image (we hope that will be more intuitive for most users). We are currently exploring how we can enhance the customizability of DH Press’s interface, either through customized child themes or through the adoption of existing widgets and other plugins. Since many of our display pages require PHP (because they are dynamic pages which aggregate content based on categories), the trick will be to find lightweight solutions to configuring the look of a DH Press site that do not require much beyond CSS and widget/plugin experimentation. Jade Davis is spearheading this effort for us.


Plugin Improvements

Here’s a closer look at what we’ve done so far to improve the beta plugin:

1. Bundled DH Press with the other required plugins

Previously, in order to use DH Press, users needed to install three other plugins (CSV Importer, which allows users to bulk load their project data; Term Menu Order; and Taxonomy Metadata). Joe has incorporated the CSV Importer and Term Menu Order into the current plugin, and is working on adding Taxonomy Metadata to allow for an easier, one-click install of DH Press in any WordPress site.

2. Eliminate category conflict

Over the summer, we began noticing odd bugs as a result of creating multiple similar projects in a single DH Press environment. While conducting trainings, we would typically use the same training data set. But when participants would go to configure their map legends, we’d see empty duplicate values. Joe has been working hard to fix this, in the event that someone wants to host multiple DH Press projects in a single site, rather than keeping projects in separate silos. Now, if your DH Press site has projects with similar or overlapping data, DH Press will create “alias” values that will improve legend set-up.

3. Parsing multiple values in a custom field

While we had always envisioned supporting motes / custom fields containing multiple unique values, we had not yet implemented this. Now, DH Press allows you to create fields containing multiple values. DH Press will parse those values properly. If you’re using that field / mote to create a legend, the first listed value in the field will determine the marker’s appearance when all markers are selected. The marker will change appearance as the filters are applied on the map, and the marker will show up any time its associated values are turned on in the map legend. The default delimiter is a comma; if you plan to use a comma you will not need to specify the delimiter when creating the mote. If you use something else (e.g. a semicolon), you can specify that so that DH Press will know how to parse your data.

For example, if a datum from the Charlotte 1911 project represents a space that is both residential and commercial, you would be able to list it as “residential,commercial” (rather than having to create a new category, such as “residential and commercial,” or “both”). When activating the “residential” markers in the building use legend, the marker would show up. But it would also show up when clicking the “commercial” value. If both values were turned on, the marker would appear as a “residential” marker.

In addition to these improvements, we are very close to supporting two additional functions:

4. Faceted search

DH Press currently allows you to create parent-child relationships in legends. You can even create new parent categories that had not been included in your original data set. This was a really important feature for “Mapping the Long Women’s Movement,” as it allowed us to create large groupings of concepts and spaces. Rather than create a unique marker for each of the 100+ concepts in our data, we grouped them into eleven parent categories (following the principle that the human eye can only process about 10-12 colors quickly). But we do not have the capacity to display all of the unique child values in the marker legend, such that a user could click on individual child categories to filter the map. Joe is very close to finishing this, so that users can drill down into the visualization with more precision in a faceted search approach.

5. Filtering the map on multiple map legends

Faceted search will be enhanced even further once users will be able to apply filters from multiple legends. Currently, we can only show one legend at a time, but with this enhancement, we’ll be able to show the intersection (“AND” / “OR”) of two (possibly more) legends. So, users exploring the Long Women’s Movement project would be able to look for markers that include a value from the “concepts” legend, and one from the “spaces” legend, for instance: oral history segments that discuss feminism (primary concept) in educational spaces.


Next Steps

Once the updated plugin is debugged, we’ll begin working on the new set of features required for our current projects:

Maps

We hope to add additional base maps, such as Google satellite view. But more importantly, we are working hard to extend the current map library beyond historic NC maps. Currently we are experimenting with TMS maps (an OpenLayers protocol) to pull in maps the CDLA processed for Driving Through Time, using a different protocol than those done for the Sanborn Fire Insurance Maps. If we can pull these maps in, we expect that other TMS-styled maps will work, too!

Finally, we are working hard to create an interface that supports multiple unique map views. While I’d like to have up to four views, this may prove too taxing for load time. So right now we’re working on two map views. This would mean that you’d be able to see, for instance, a map of Charlotte in 1911 and a map of Winston-Salem in 1912. Or maybe you want to see two different years for one place. This will be a critical feature for our Lebanese Migration to NC project, which will be part of an exhibit at the NC Museum of Art in February, 2013.

Audio/Transcript Tool

We are also working to extend the audio/transcript tool in two significant ways:

First, we are expanding to include video files that are streaming from YouTube. This would function exactly like our SoundCloud audio files, but it would work with an embedded YouTube media player instead.

Second, we are working to extend the capabilities beyond English interviews. While we cannot automate the transcript timestamping process for non-English files (our version of Docsoft:AV only supports English and is cost-prohibitive to update), preliminary experimentation with manual timestamping has been encouraging. We are developing a process for handling parallel English and Spanish transcripts in a single instance, such that users may be able to view one or the other (or both) transcripts while listening to the audio. Stay tuned for our progress on that front.

We’re also hoping to create a more dynamic transcript view that scrolls along with the playing audio, to help users find their way in the transcripts better.

Additional Entry Points

Once we’ve stabilized the new version of the plugin, we’ll also begin adding additional entry points, or visualizations. We’ll start with a timeline view. Preliminary discussions suggest that the first implementation will be integrated with the map, so that site visitors would be able to see the display of markers in a chronology. We have not yet begun testing this, so our implementation will likely change.

Secondly, we’ll be working on what we’ve been calling the “topic card” view, which is a gallery entry point into the data (check out this early demo using jScroll for infinite scrolling). This will be a nice visualization for image-heavy projects, such as the Digital Portobelo project.

Ultimately, users will be able to create multiple entry points into a single project. We think this will require configuring modals that are unique to each entry point. This will greatly enhance the power of DH Press, and move it beyond a spatial-mapping tool.

I’ll report back on our progress over the coming months. In the meantime, got an idea for a feature? Email me!

DH Press Workshop at the University of South Carolina

Just over a week ago, DIL/DH Press team member Stephanie Barnwell and I traveled to Columbia, S.C. to conduct a one-day workshop on DH Press for the Center for Digital Humanities at the University of South Carolina.

We spent a lovely day with about twenty-two faculty, library staff, and graduate students. Many have been involved in digital humanities work for some time now; others were just getting started.

Stephanie Barnwell explains WordPress.

Stephanie Barnwell explains WordPress.

Despite a few technical hiccups (aren’t there always a few?), we managed to cover a lot of ground. After a brief introduction to DH Press, we provided a quick primer in WordPress basics, and then spent the rest of the morning discussing the nature of humanities data — how to build humanities data sets, what some of the challenges might be in working with incomplete and “fuzzy” data, and how to anticipate your data needs.

After lunch, we jumped into DH Press. First, our participants each created a project in DH Press using a subset of data from the “Charlotte 1911” project. I always like to start trainings with data that I know are clean and formatted to work in DH Press. This way, it’s easier to solve the problems that may arise along the way. Fortunately, just about everyone was able to create and publish a project.

We ended the day with a highly experimental session, one that I’d never tried before and wasn’t sure would even work. We asked participants to bring their own data sets (and we provided some random data sets for those who didn’t have one). These were “messy” data sets — not necessarily well suited for DH Press, many lacking any sort of geographical information required for the map visualization. The goal was to get these data sets into DH Press by the end of the day.

We asked participants to think about what they wanted to do with their data — what did they want to visualize and present to others, what sort of information would they need to extract, and what stories were they trying to tell? Participants then had to determine what sort of information was missing from their data, and how they would go about filling in those gaps. While we ran out of time to finish this session, several individuals were able to format their data successfully and publish a project.

We were so grateful for the opportunity to share DH Press with USC. We hope that some folks down there will adopt DH Press for their own projects, in which case I’ll share the results of any of those projects.

And a special thank you to Stephanie, who did an amazing job teaching everyone how to use WordPress and DH Press. She proved to be an excellent instructor and a wonderful traveling buddy.

DH Press and the Long Women’s Movement Attract Attention

Since the official launch of “Mapping the Long Women’s Movement,” DH Press has begun attracting attention in the media, which is attracting more users. This blog post will serve as a running list of the ongoing news coverage.

  • For starters, WUNC posted a short piece about the project on their website (21 August 2013).
  • UNC’s University Gazette featured our work in their 21 August issue, as well. Read the full story.
  • UNC’s School of Information and Library Science published a nice piece on August 26.

Look for more to come soon!

DIL Launches “Mapping the Long Women’s Movement”

I am pleased to announce that our leading DH Press pilot project, Mapping the Long Women’s Movement, is now online! This project represents a major collaboration between the Digital Innovation Lab, the Southern Oral History Program, and the Renaissance Computing Institute. Read more.

This project, which has been the primary use case for developing the beta release of DH Press, has been a long time in the making. What began as a tentative conversation with SOHP Digital Humanities Coordinator, Seth Kotch, in February 2012 is now a full-fledged project. We had an idea that we wanted to spatialize/map a collection of oral histories that all spoke to the importance of place and space in the women’s movement in Appalachia. But this project is so much more than a visualization of sound. Read more about the project.

Project Highlights

Mapping the Long Women's Movement

Visualizing oral history: each marker on the map represents a segment of an oral history.

Mapping the Long Women’s Movement offers an innovative approach to delivering digitized oral history content. Traditional library catalogs may host an oral history’s full audio file, accompanied by a transcript (often as a PDF). But this system is often inadequate for finding what you’re looking for, since it relies upon limited indexing and in-browser searching (which only works for exact text matches). And while the audio files are accessible, they are typically underutilized because it is far easier to skim a transcript than listen to a long interview.

Our project allows users to explore audio files and accompanying transcripts by jumping directly into the audio file, using the transcript and the map-based visualization as anchors for searching and browsing the content. Each marker on the map is associated with a segment of an audio file. When you click on a marker, you’ll be able to listen to that section of the interview, read the corresponding transcript, and see additional information about that audio segment. You can then link out to the full audio/transcript, where you can listen to the entire file or jump around as you like.

Start Exploring

audio and transcript

Explore the audio/transcript with a click of the mouse.


When you launch the project, you’ll be taken to a map with lots of markers on it. These represent stories categorized by eleven unique concepts — the women’s movement, life history, movements/social activism, etc. — across the forty-eight interviews in the project. You can switch the markers you see on the map by changing the layer (each layer filters the markers based on a different attribute in the data). You can filter the map by concept, type of space, interviewee, or interviewer.

Each marker you click will bring up a different excerpt of an interview; you can listen to that section or jump out to the entire interview. When listening to the entire interview, you’ll be able to jump to any point in the audio or transcript with a simple click of your mouse: either drag the red line in the media player, or click on any point in the transcript to start jumping around. It’s that easy!

You can also link out to related content from each marker. By clicking the “concept link” in each marker bubble, you can see a set of related markers based on that concept. So if you are exploring the theme of feminism, you can see a set of related content across all of the interviews.

We’ll start formal user testing with this project in the Fall 2013 semester. In the meantime, email me to let us know what you think about the project!

Look for additional features, including a timeline visualization and “topic card” visualization, to come online soon!


Special thanks to the DH Press development team: Joe Hope (RENCI), Stephanie Barnwell & Jade Davis; along with our former contributors: Joe Ryan, Chien-Yi Hou, and Bryan Gaston, and all of our wonderful undergraduates: Chris Breedlove, Beth Carter, Charlotte Fryar & Lauren Stutts. At the SOHP: Jessie Wilkerson, Liz Lundeen and Hudson Vaughan did a great job creating and verifying the content. And, of course, a major thank you to Seth Kotch, our client/PI, for his everlasting patience and good humor as we stumbled along.

A New Home for the Digital Innovation Lab

After nearly two years, the Digital Innovation Lab has found a new and permanent home in Greenlaw Hall, Room 431. This new space will host the DIL’s staff and students, as well as staff, faculty, graduate students, and postdoctoral fellows who contribute to the Carolina Digital Humanities Initiative.

The DIL's new home.

The DIL’s new home.

Our new lab space features four work stations for staff and eight shared work stations for students and faculty/graduate fellows. There are two collaborative work spaces and a meeting area that can hold twelve people. We designed the space to be as flexible as possible, so that work stations can be reconfigured and the meeting space can be extended to accommodate more people.

The new space was made possible with funding from the College of Arts and Sciences, and the design was created by UNC Facilities Design Services.

Stay tuned for details about our upcoming open house. In the meantime, stop by and check out our new space!

Now Accepting Applications for DIL/IAH Faculty Fellowships

Part of the Carolina Digital Humanities Initiative, the DIL/IAH Faculty Fellowships support UNC faculty who are interested in developing digital humanities as a significant dimension of their academic practice; pursuing an interdisciplinary, collaborative digital humanities project arising from their research, pedagogy, or engaged scholarship that is likely to be of interest to users beyond academic specialists and which raises larger social, historical, literary, or artistic issues; reflecting upon and discussing with colleagues the implications of digital humanities for their own academic practice; and applying what they have learned as DIL/IAH Faculty Fellows to their graduate and/or undergraduate teaching and mentoring.

Applications for the 2014/2015 academic year are due Friday, September 27.

Consult the guidelines for the 2014 DIL/IAH Faculty Fellowship Program for details. Email DIL Manager Pam Lach for more information or to set up a consultation.